
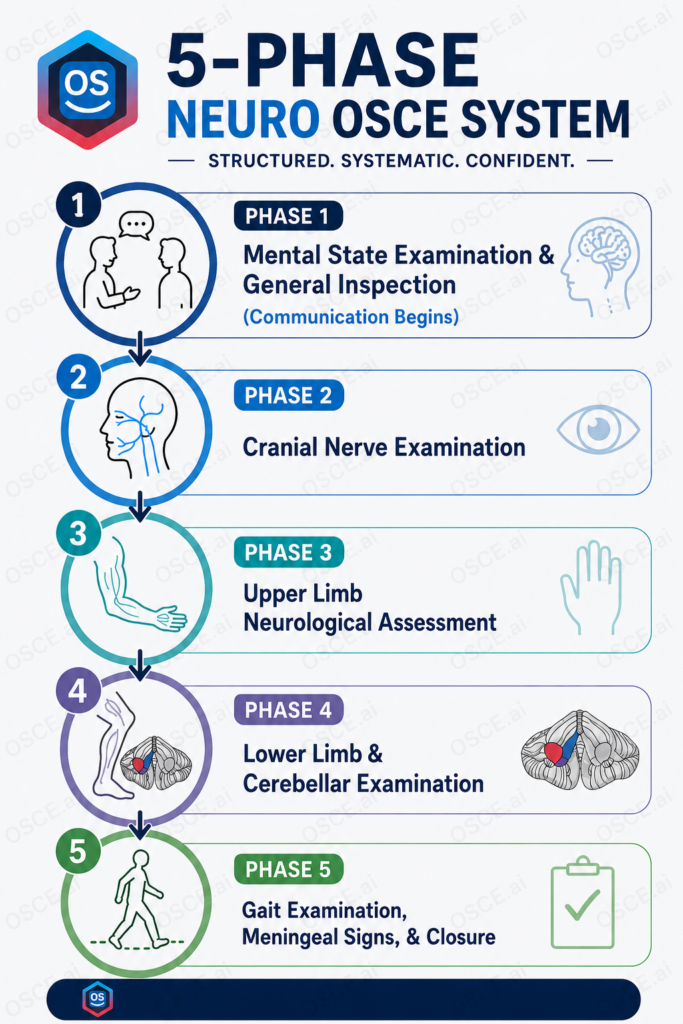
The neurological examination (hereafter referred to as 'neuro exam' for short) is one of the most tested and most failed OSCE stations. Capable students lose marks in physical examination not from lack of knowledge, but from performing it without a system, missing steps, giving unclear instructions, or forgetting a structured handover. This guide gives you the 5-Phase Neuro OSCE System: a step-by-step sequence that integrates every neuro exam component with communication scripts. Built from examiner mark schemes and common pitfalls, it helps students achieve zero missed components, full communication marks, and faster exams.
Cerebellum photo credit: https://step1.medbullets.com/neurology/113009/cerebellum
If you haven't yet read our Ultimate Guide to OSCE Mark Schemes (2026), which reveals the 10 examiner secrets for scoring above 75% in any station, start there. The guide you're about to read applies those principles directly to the neuro exam, giving you the specific tools to execute perfectly.
Let's walk through the system, phase by phase.
Knowing the sequence is one thing. Performing it smoothly under time pressure is another. Practice realistic OSCE scenarios on OSCE.ai and get structured feedback on your clinical performance and decision-making.
Practice OSCE stations free →The Silent Grade-Killer: Why Communication Fails Most Neuro Exams
In a neurological OSCE, you’re not just assessing the nervous system; you’re interacting with a person who may be anxious, confused, or in pain. They might have a deficit that you’re about to uncover. The examiner is watching you navigate all of this, and a rigid checklist approach will fail you.
Consider the marks you can lose without a word:
- You launch into the cranial nerve exam without asking if the patient is in any pain.
- You run a sharp object along the sole of their foot for the plantar reflex without warning them.
- You mutter “weakness” under your breath while testing power, alarming the patient.
- You finish and walk out without thanking them or offering to help them put their shoes back on.
These are not just politeness points. They are core clinical skills. Before we even touch the physical steps, lock in these five communication habits. They will form an invisible, parallel layer throughout our 5-Phase System.
- Introduce & Consent: “Hello, my name is [Name], I’m a medical student. I’ve been asked to perform a neuro exam, which means I’ll be checking your nerves, muscles, and coordination. Is that alright with you?”
- Instruct Clearly: Use simple, non-medical language. “Please follow my finger with just your eyes, keep your head still.”
- Maintain Composure: If you find a deficit, your face and words should be neutral. “I’m just going to note that down. You’re doing well.”
- Reassure & Warn: Before any potentially uncomfortable test, say “This might feel a little cold/scratchy, but it won’t hurt.”
- Close with Care: Summarize briefly for the patient, thank them genuinely, and ensure they are comfortable before turning to the examiner.
Keep these five habits active. Now, let’s integrate them into a flawless physical examination sequence.
Phase 1: Mental State Examination & General Inspection
Your exam starts the moment the patient walks in or you enter the room. Observation is your first tool, and your introduction is your first test.
What You’re Examining:
- General Inspection from the Door: Posture, abnormal movements (tremor, chorea), facial asymmetry, limb neglect, hearing aids, spectacles.
- Mental State Examination (MSE): A rapid screen covering:
- Appearance & Behavior: Eye contact, rapport, signs of self-neglect.
- Speech: Rate, rhythm, volume, fluency (dysarthria, dysphasia).
- Mood & Affect: “How has your mood been lately?”
- Thought Process: Coherence of conversation.
Cognition: Orientation to time, place, person. A brief memory test (e.g., “Remember these three words: apple, table, penny.”).
Insight: “Why do you think you’re here today?”
The 5-Phase System Communication Script for Phase 1:
"Good morning. My name is [Name], I’m a medical student. I’m going to be doing a neurological exam today, which involves checking how your nerves and muscles are working. It will include looking at your strength, sensation, and coordination. Is that okay? Can I confirm your full name and date of birth? Thank you."
“While we’re talking, I’ll just be observing you. Can you tell me where you are right now and roughly what the date is?”

Key Observation Tip: As the patient walks to the chair or bed, you’ve already begun your gait assessment (Phase 5). Note any unsteadiness, use of a walking aid, or hemiplegic posture immediately. Don’t miss the chance to start your observation early.
Phase 2: Cranial Nerve Examination in Neuro Exam
This phase requires you to be in the patient’s personal space. Clear instructions are vital to avoid startling them.
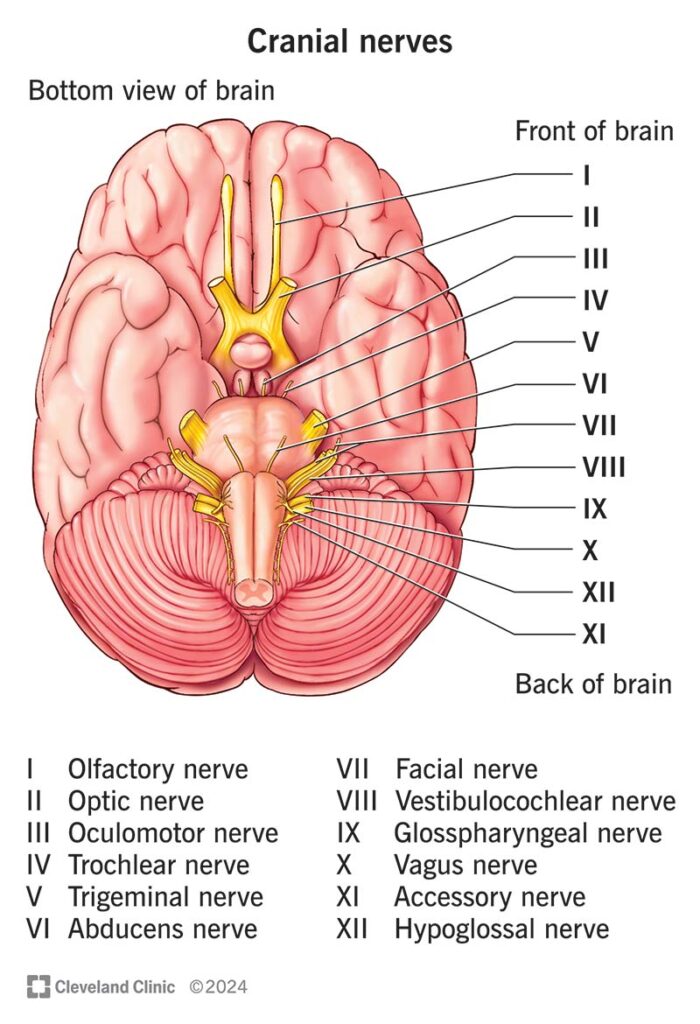
What You’re Examining (OSCE-high-yield order):
- CN I (Olfactory): Not routinely tested unless specifically requested. Mention it if asked: “I would formally test smell if indicated.”
- CN II (Optic): Visual acuity (Snellen chart or reading a text), visual fields by confrontation (“I’m going to bring my fingers in from the side, say ‘yes’ when you see them.”), fundoscopy (dim the lights, explain you need to get close).
- CN III, IV, VI (Oculomotor, Trochlear, Abducens): Eye movements (‘H’ pattern), saccades, convergence, pupillary reflexes (direct and consensual). “Please keep your head still and follow my finger with just your eyes. Tell me if you see double at any point.”
- CN V (Trigeminal): Sensation to light touch on the forehead, cheek, and chin. Motor function: jaw clench, masseter palpation. Corneal reflex (mention only, performed only if needed).
- CN VII (Facial): “Raise your eyebrows, screw up your eyes tight, puff out your cheeks, give me a big smile.” Assess for upper vs. lower motor neuron lesion difference (forehead sparing).
- CN VIII (Vestibulocochlear): Whisper test. “I’m going to whisper a number and I want you to repeat it back, covering my mouth so you can’t lip-read.” Perform Rinne’s and Weber’s tuning fork tests if conductive vs. sensorineural hearing loss is suspected.
- CN IX, X (Glossopharyngeal, Vagus): Listen to the patient’s voice (hoarseness?), ask them to say “aah” and observe uvula deviation. Swallowing and cough (gag reflex mentioned but rarely performed).
- CN XI (Accessory): “Shrug your shoulders against my hands. Turn your head to the left against my hand.”
- CN XII (Hypoglossal): “Open your mouth and stick out your tongue. Look at the tongue for wasting and fasciculations, then test power by pushing it into your cheek from the outside.”
Communication Pitfall to Avoid: For the fundoscopic exam, you will be face-to-face, very close, in a dim room. Never spring this on a patient. Say, “I’m now going to look at the back of your eye. I’ll need to dim the lights and get quite close. It won’t hurt, but the light will be bright.”
Phase 3: Upper Limb Neuro Exam
You’re now moving to the motor and sensory systems. The upper limb is often the most polished part of the student’s exam, but the instructions can be rushed. Speak slowly and precisely.
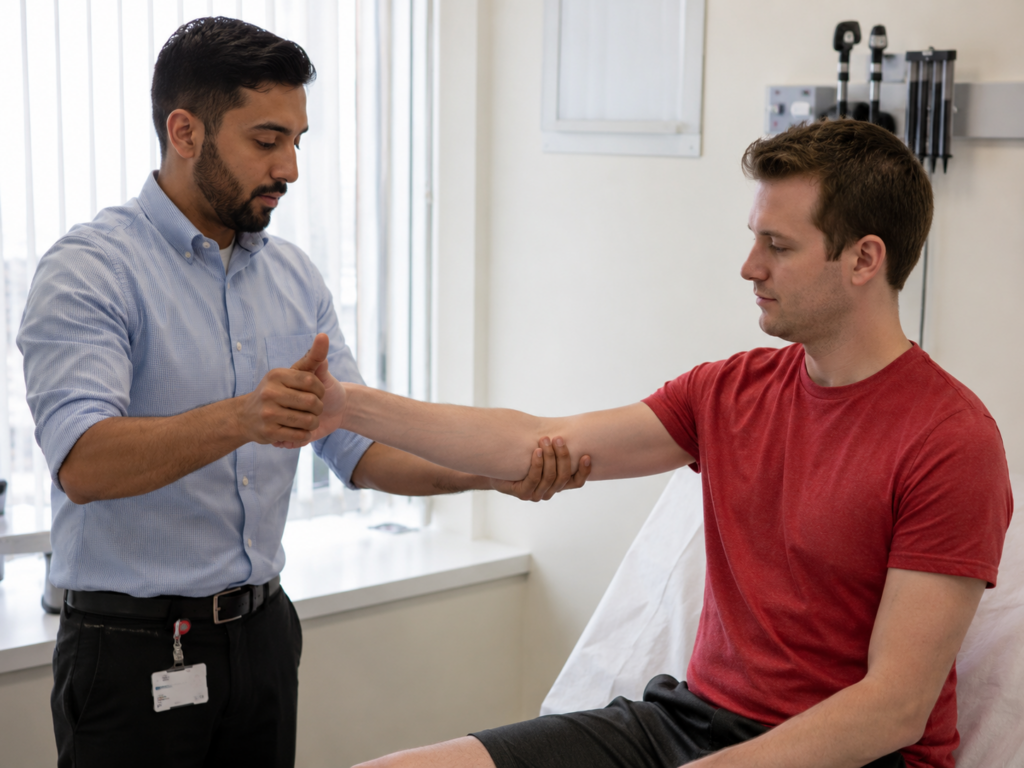
What You’re Examining:
Inspection: Look at the muscles of the hands, arms, and shoulder girdle for wasting (thenar, hypothenar eminences, dorsal interossei) and fasciculations. “I’m just going to have a look at the muscles of your arms and hands.”
Tone: “Let me do all the work. Keep your arm floppy like a rag-doll.” Passively move the shoulder, elbow, and wrist, feeling for spasticity (clasp-knife) or rigidity (lead-pipe, cogwheel).
Power: “I’m now going to test your strength. Don’t let me push you down/push up.” Test shoulder abduction, elbow flexion/extension, wrist extension/flexion, finger abduction (spread fingers against resistance), and grip strength. Document using the MRC scale (0–5).
Pronator Drift: “Extend both arms out in front of you, palms facing the ceiling, and close your eyes. Hold them there.” Observe for pronation or downward drift, a sensitive sign of upper motor neuron lesions.
Reflexes: “I’m going to tap on some tendons with this small hammer. It might feel a bit odd, but it won’t hurt.” Elicit biceps (C5/6), triceps (C7/8), and brachioradialis (C5/6) reflexes. Use reinforcement if needed.
Sensation: “I’m going to test the feeling in your arms and hands. Close your eyes and say ‘yes’ whenever you feel me touch you.” Use a cotton wisp for light touch and a neuro-tip for pinprick (sharp/soft discrimination). Test vibration sense with a 128 Hz tuning fork on a bony prominence (knuckle), and proprioception by moving the distal joint of a finger up or down.
Coordination (Cerebellar): “I’d like you to touch my finger, then your nose, and go back and forth as quickly and smoothly as you can.” Test finger-to-nose, then rapid alternating hand movements (dysdiadochokinesia). “Pat your hand on the back of your other hand, flipping it over each time, as fast as you can.”
Crucial Communication Tip for Weakness: If you find true weakness, do not say “Wow, that’s really weak.” Instead, maintain a neutral, encouraging tone: “That’s fine, thank you for pushing.” Your job is to note the finding, not to diagnose it to the patient in the station.
Phase 4: Lower Limb & Cerebellar Examination in Neuro Exam
You’ll often need to ask the patient to lie down. Always guide them and ensure they’re comfortable.
What You’re Examining:
Inspection & Tone: Inspect for muscle wasting and fasciculations in the legs. “Let your leg go heavy and floppy again.” Roll the leg and check for clonus at the ankle. “I’m going to bend your knee a little and then quickly move your foot up. Just relax.”
Power: “Lift your leg up against my hand, don’t let me push it down.” Test hip flexion, knee flexion/extension, ankle dorsiflexion, plantarflexion, and extensor hallucis longus.
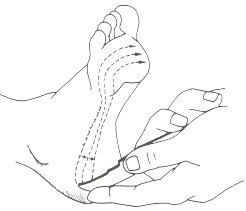
Reflexes: Elicit the knee jerk (L3/4) and ankle jerk (S1/2). “I’m just going to let your leg hang over my arm and tap below the knee.” For the ankle, ask them to relax and slightly externally rotate the hip. Plantar response (Babinski): “I’m now going to run a key along the sole of your foot. It might feel scratchy, but I need you to keep your foot still.” Look for upgoing toe (UMN sign).
https://www.ncbi.nlm.nih.gov/books/NBK397/
Sensation: Follow the same pattern as the upper limbs: light touch, pinprick, vibration on the big toe and ankle, and proprioception of the big toe.
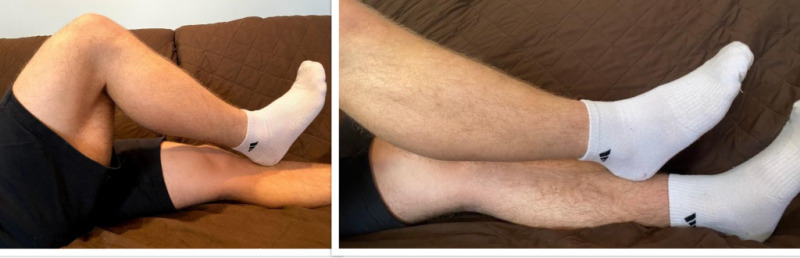
Cerebellar Examination (Lower Limb):
“Lie down and run your heel up and down your opposite shin, lifting it off and placing it precisely each time.” This is the heel-to-shin test.
Finally, Romberg’s test: “Please stand up for me, feet together, arms by your side. First with your eyes open, then close your eyes. Don’t worry, I’ll be right here and won’t let you fall.”
Stand close and ready to catch the patient. A positive Romberg’s sign (swaying with eyes closed) suggests sensory ataxia (proprioceptive loss).
The Romberg’s Communication Must-Do: Never say, “Try not to fall.” It creates anxiety and makes a fall more likely. Your words must be a safety net: “I’ve got you. You’re safe.”
Phase 5: Gait Examination, Meningeal Signs, & Closure
Gait ties together motor, sensory, cerebellar, and cognitive function. It’s a rich source of neurological information.
What You’re Examining:
- Casual Gait: “I’d like you to walk to the end of the room, turn around, and walk back, at your normal pace.”
Observe for stride length, arm swing, turning, and base width. - Tandem Gait (Heel-to-Toe): “Now please walk placing the heel of one foot directly in front of the toes of the other, like you’re on a tightrope.”
This challenges coordination and balance. - Toe and Heel Walking: “Walk on your tiptoes for me” (tests S1 plantarflexion). “Now walk back on your heels” (tests L4/5 dorsiflexion).
- Postural Stability: “Stand with your feet apart. I’m going to give you a gentle push backward. Don’t let me push you over.”
Do not perform if the patient is unsteady; just mention you would test it. - Meningeal Signs (If Clinically Relevant): If the history suggests headache, fever, or photophobia, you must examine for neck stiffness. “I’m going to gently bend your neck forward. Stop me if there’s any pain.”
Then check Kernig’s and Brudzinski’s signs. Mention these as a set piece to show your thoroughness. - Closing the Station: The Mark-Saving Sequence
This is where you transform a good station into an excellent one. Do not rush off. Turn back to the patient:
“Thank you very much for letting me examine you. That’s the end of the formal exam. Let me help you put your shoes back on. Do you have any questions before I speak to my examiner?”
Then, turn to the examiner and deliver a crisp SBAR handover of your neurological findings:
Situation: “I performed a full neuro exam on [Patient Name].”
Background: Briefly relevant history if known.
Assessment: “On neuro exam, my key findings are [summarize positive and relevant negative findings, e.g., normal cranial nerves, right-sided upper limb weakness with hyperreflexia, no cerebellar signs, normal gait].”
Recommendation: “I would like to further assess [X] and consider imaging such as [CT/MRI] after discussion with my senior.”
This shows structured thinking and completes your communication cycle perfectly.
Your Neuro Exam Communication Checklist
Use this table to mentally tick off both the neuro exam step and the corresponding communication skill. This is the core of the 5-Phase System.
Neuro OSCE Communication & Exam Roadmap
A step-by-step guide to combining neuro exam technique with clear, patient-centred communication.
First Impressions Matter
Cranial Nerves CN II–XII
Upper Limb Motor Examination
Upper Limb Sensory & Coordination Testing
Lower Limb Motor Examination
Sensory & Cerebellar Assessment
Gait Assessment
Meningeal Signs When Indicated
SBAR Handover & Patient Care
Top 5 Communication Pitfalls in Neuro OSCEs (and How Our System Fixes Them)
Pitfall: The Silent Start. You begin testing without a proper introduction.
System Fix: Phase 1 mandates the full introduction script before any contact.
Pitfall: The Vague Instruction. “Move your arm this way” leads to confusion.
System Fix: Use our scripted, precise commands: “Push your arm up against my hand.”
Pitfall: The Startling Sensation. You apply a sharp object or cold tuning fork without warning, causing the patient to jump (and lose trust).
System Fix: Our sensory scripts always begin with, “This might feel a bit…”
Pitfall: The Unfiltered Diagnosis. You mutter “tremor” or “weakness,” frightening the patient.
System Fix: We’ve embedded the rule of neutrality: you note findings without labeling them to the patient’s face.
Pitfall: The Vanish. You finish the exam and immediately address the examiners, ignoring the patient still sitting there.
System Fix: Phase 5 closes the interaction with the patient first, with thanks and an offer to help, before the SBAR handover.
Neuro Exam FAQ
What are the most commonly tested cranial nerves in an OSCE neuro exam?
CN II (fundoscopy, visual fields, acuity), CN III/IV/VI (eye movements, pupils), CN VII (facial symmetry), and CN XII (tongue) are almost always tested. Know the full screen, but prioritize these for perfection.
How much of the neuro exam will I actually have to do in an OSCE station?
You must be ready to do it all, but often, examiners will say “Please examine the upper limbs neurologically” or “Examine this patient’s gait and lower limbs.” Our 5-Phase System lets you seamlessly activate the relevant phases while maintaining the same communication core.
What is a Romberg’s test, and what does a positive result mean?
Romberg’s test assesses proprioception and sensory ataxia. The patient stands feet together, first with eyes open, then closed. A positive test is significant swaying or falling only when the eyes are closed, indicating a loss of proprioceptive input (dorsal column dysfunction). You must always say, “I’m right here, you won’t fall.”
How is the neuro exam in a OSCE station marked?
For a complete breakdown of how all OSCE stations are scored, including the hidden marks most students miss, see our Ultimate Guide to OSCE Mark Schemes.
Conclusion: Become the Candidate Examiners Remember
Neurological OSCE stations are designed to test your ability to multitask: to simultaneously think about neuroanatomy and maintain a calm, professional human connection. The 5-Phase Neuro OSCE System eliminates the mental split. It gives you a repeatable structure where the words you say and the tests you perform are one and the same.
Practice this neuro exam system until your hands and voice move in sync. Use the checklist. When you do, you won’t just pass the station; you’ll be the candidate who makes the examiner think, “That’s exactly how it’s done.”
Ready to master your next OSCE? Explore our other comprehensive examination guides.