OSCE Template
OSCE Template: Proven Way to Score Higher With Confidence
This guide gives you a complete OSCE template for medical students: a step-by-step structure you can use in history taking, physical examination, communication, counselling, and management stations. You will learn how to start an OSCE station confidently, ask focused questions without sounding robotic, explore the patient’s concerns, present findings clearly, explain your plan in patient-friendly language, and close safely before the timer runs out.
The result is a more reliable OSCE performance: fewer missed opening marks, better patient rapport, stronger clinical structure, clearer examiner-facing summaries, and safer endings with proper next steps and safety-netting. Instead of walking into each station hoping you remember the right checklist, you will have a repeatable system for what to do, what to say, and what the examiner is likely marking.
The secret behind this approach is the OSCE.ai Performance System: a structured method that turns an ordinary OSCE checklist into a flexible clinical framework. It combines examiner expectations, patient-centered communication, timing strategy, and practical scripts so you can adapt the same template across different OSCE stations. Whether you need an OSCE history taking template, a physical examination OSCE template, an OSCE communication checklist, or examiner tips for a management station, this guide gives you the structure to perform like a safe, organized, high-scoring candidate.
The goal is simple: enter the room with a structure, adapt to the patient, prioritize what matters, and leave the examiner with a clear impression of safe clinical competence.
What Is an OSCE Template?
An OSCE template is a structured framework for approaching a clinical station in a predictable, high-scoring way. It gives you a sequence for the encounter so that you do not rely on memory alone when the timer starts.
A strong OSCE template usually includes:

In real clinical practice, every patient is different. In an OSCE, every station is different too. But the underlying performance structure is often similar. You need to show that you can build rapport, gather relevant information, think clinically, protect patient dignity, manage time, and close safely.
A template does not make you robotic. Used properly, it does the opposite: it reduces cognitive load so you can listen more carefully.
Why Students Need an OSCE Template
OSCE stations are short, artificial, and high-pressure. You may have 7, 8, 10, or 11 minutes to demonstrate what would usually happen more naturally in a clinical environment. That time pressure creates predictable problems.
Students often:
| Common problem | Why it costs marks |
|---|---|
| Starting abruptly | Looks unprofessional and unsafe |
| Forgetting identity or consent | Loses easy professionalism marks |
| Asking only closed questions | Misses the patient’s narrative and agenda |
| Ignoring emotion | Weakens rapport and communication score |
| Forgetting red flags | Raises safety concerns |
| Not summarizing | Makes reasoning invisible to the examiner |
| Performing examination silently | Examiner cannot see what you are looking for |
| Ending without a plan | Leaves the patient unclear and the station incomplete |
| Running out of time | Prevents closure, safety-netting, and synthesis |
The examiner is not only asking, “Does this student know the topic?” They are also asking, “Would I trust this student to behave safely with a real patient?”
That means your OSCE performance has two layers.
The first layer is clinical: symptoms, signs, differential diagnosis, examination, investigations, management, red flags, and escalation.
The second layer is communicative: respect, clarity, empathy, signposting, consent, patient involvement, and closure.
A strong OSCE template combines both.
How OSCE Examiners Think
Most OSCE stations reward a combination of task completion and overall clinical performance. Examiners may use checklists, global rating scales, oral question answer keys, or station-specific marking guides.
In practical terms, this means you must do two things at the same time:
- Complete the task
- Make your competence visible
A student may know the right diagnosis but fail to show safe reasoning. Another student may communicate warmly but miss urgent red flags. A high-scoring student does both: they complete the station task while appearing organized, safe, and patient-centered.
A useful self-check after every OSCE practice station is:
“If I were the examiner, could I easily see where to award the marks?”
If the answer is no, your performance is too hidden. You need to verbalize your structure, reasoning, and next steps more clearly.

The Generic OSCE Station Flow
Use this flow as your default map before adapting to the exact station brief.
| Stage | Candidate action | Examiner focus |
|---|---|---|
| 1. Read the door instructions | Identify task, setting, time, patient details, and required output | Does the student answer the actual task? |
| 2. Enter and open | Hand hygiene if relevant, introduce, confirm identity, explain role, gain consent | Professionalism and safety |
| 3. Start broad | Open question, patient story, do not interrupt too early | Listening and rapport |
| 4. Focus | Targeted history, examination, explanation, or management | Clinical relevance |
| 5. Explore perspective | Ideas, concerns, expectations, emotion, non-verbal cues | Patient-centeredness |
| 6. Signpost and summarize | Organize sections and summarize key points | Structure and synthesis |
| 7. Act or explain | Examine, counsel, manage, escalate, or present findings | Task completion and reasoning |
| 8. Close safely | Plan, questions, safety-net, thank patient | Safe closure |
The flow is generic. The station brief is always more important than the template. If the door instructions ask you to manage an acutely breathless patient, you should not spend six minutes taking a routine history. Prioritize the immediate clinical problem.

The Core 7-Step OSCE Template
Step 1: Enter, Introduce, Confirm, and Consent
Your first 30 seconds shape the examiner’s impression.
A safe opening script:
“Hello, my name is [Name]. I’m one of the medical students. Can I confirm your full name and date of birth, please? I’ve been asked to speak with you today about [problem]. Is that okay?”
Then add comfort:
“Before we start, are you comfortable? Is it okay if I ask you some questions?”
For examination stations:
“I’d like to examine your [system/body area]. I’ll explain each step as I go, and you can ask me to stop at any time. Is that okay?”
For sensitive examinations, follow local policy and offer a chaperone where appropriate. If the examination is not permitted in your OSCE setting, state clearly what you would do and inform the examiner.
This step may feel basic, but it protects high-value marks: greeting, role, identity, consent, comfort, dignity, and professionalism.
Step 2: Open the History Properly
Many students begin too narrowly:
“Do you have chest pain? Is it sharp? Does it radiate? Do you smoke?”
That may gather data, but it can make the patient feel interrogated.
A stronger opening is:
“Can you tell me what brought you in today?”
Then let the patient speak. After the opening story, signpost the transition:
“Thank you. I’m going to ask some more focused questions now so I can understand this properly.”
This shows that you can move from open to closed questioning without sounding chaotic.
For symptom analysis, use the relevant framework. For pain, SOCRATES is useful:
| SOCRATES item | Natural question |
|---|---|
| Site | “Where exactly is the pain?” |
| Onset | “When did it start?” |
| Character | “What does it feel like?” |
| Radiation | “Does it move anywhere?” |
| Associated symptoms | “Any shortness of breath, nausea, sweating, dizziness, or fever?” |
| Timing | “Is it constant or does it come and go?” |
| Exacerbating/relieving factors | “What makes it better or worse?” |
| Severity | “On a scale of 0 to 10, how bad is it?” |
Do not sound as if you are reading a checklist. Use the framework as a map, not a script.
Step 3: Explore the Patient’s Perspective
A technically complete history can still fail if it misses the patient’s agenda.
Ask patient-centered questions when relevant:
“What do you think might be going on?”
“Is there anything in particular you are worried about?”
“What were you hoping we could help with today?”
These questions are not decorative. A patient with headache may be worried about a brain tumor. A patient with chest pain may be frightened because a parent died of a heart attack. A patient with fatigue may be worried that something serious is being missed.
Also watch for emotion. If the patient looks anxious, tearful, hesitant, embarrassed, angry, or withdrawn, respond directly.
Useful phrases:
“I can see this has been worrying you.”
“That sounds really difficult.”
“Thank you for telling me that.”
“It makes sense that you would feel concerned.”
Empathy does not need to be dramatic. It needs to be timely, specific, and genuine.
Step 4: Use Signposting, Summaries, and Transitions
Structure is one of the easiest ways to sound more competent.
Without signposting, the consultation feels like a random list of questions. With signposting, the patient and examiner can follow your reasoning.
Useful transitions:
| Situation | Signposting phrase |
|---|---|
| Moving to past history | “I’d like to ask about your past medical history now.” |
| Moving to medication | “I’m going to ask about medications and allergies.” |
| Moving to social history | “I’ll ask a few lifestyle questions because they can affect this condition.” |
| Moving to exam | “I’d like to examine you now, if that’s okay.” |
| Moving to explanation | “I’ll explain what I think may be going on and what we should do next.” |
| Summarizing | “Let me summarize what I’ve understood so far.” |
A good summary is short, selective, and clinically weighted.
Example:
“So, just to summarize: you’ve had central chest tightness for two hours. It came on while walking, radiates to your left arm, and is associated with sweating and nausea. You also have high blood pressure and you smoke. Is that correct?”
That summary confirms facts, highlights red flags, and shows clinical prioritization.
Step 5: Perform or Verbalize a Focused Examination
For physical examination stations, follow a predictable order.
| Step | Action |
|---|---|
| 1 | Wash hands |
| 2 | Introduce yourself and confirm identity |
| 3 | Explain the examination |
| 4 | Gain consent |
| 5 | Position the patient correctly |
| 6 | Expose appropriately while preserving dignity |
| 7 | Inspect from the end of the bed |
| 8 | Examine systematically |
| 9 | Thank the patient and restore comfort |
| 10 | Present findings and completion steps |
Example:
“I would like to examine your cardiovascular system. This will involve looking at your hands, face, neck, and chest, and listening to your heart. I’ll keep you covered as much as possible. Is that okay?”
During the exam, communicate clearly:
“I’m just going to feel your pulse now.”
“I’m going to listen to your heart in a few places.”
“Let me know if anything is uncomfortable.”
At the end:
“Thank you. You can cover yourself now.”
Then present findings clearly:
“On examination, the patient appeared comfortable at rest. There was no peripheral cyanosis, clubbing, or ankle edema. The pulse was regular. Heart sounds were normal with no added sounds or murmurs. To complete my examination, I would check blood pressure, oxygen saturation, review the observation chart, and consider an ECG if clinically indicated.”
If time runs short, verbalize what you would do next. In many OSCEs, saying what you are doing, what you are looking for, and what findings you detect is essential.
Step 6: Explain Your Impression and Plan Clearly
Students often become too technical when explaining.
Avoid:
“You may have myocardial ischemia secondary to atherosclerotic plaque rupture.”
Use patient-friendly language first:
“Your symptoms could be coming from your heart, and we need to treat that as urgent until we know otherwise.”
Then explain the next steps:
“The next step would be to check your observations, do an ECG, take blood tests including heart markers, and ask a senior doctor to review you urgently.”
For non-emergency cases:
“Based on what you’ve told me, there are a few possible explanations. I’d like to examine you and arrange some tests before making a firm diagnosis.”
A safe OSCE explanation usually includes:
| Element | Example |
|---|---|
| Likely impression | “One possibility is…” |
| Differential thinking | “There are also other causes we need to consider…” |
| Next steps | “I would like to…” |
| Reason | “The reason this matters is…” |
| Safety | “If you develop…” |
| Understanding check | “Does that make sense so far?” |
Do not just give information. Check that the patient has received it.
Step 7: Close the Station Safely
A weak ending can damage an otherwise strong performance. Many students simply stop when the timer is close. A better candidate closes deliberately.
Use this closing template:
“To summarize, today we discussed [main problem]. The most important points are [key findings]. The next steps are [plan]. I’ll also make sure [safety action or senior review]. Do you have any questions or concerns before we finish?”
For counselling or management stations, add safety-netting:
“If your symptoms get worse, or if you develop [specific red flags], please seek urgent medical help.”
For a history station:
“Thank you for speaking with me. I’ll now discuss this with my senior and we’ll decide the next steps.”
For an examination station:
“Thank you. That completes my examination. I would now like to present my findings to the examiner.”
Patients value knowing what was decided, what happens next, when it will happen, and what they should do if things change. Examiners value exactly the same thing.
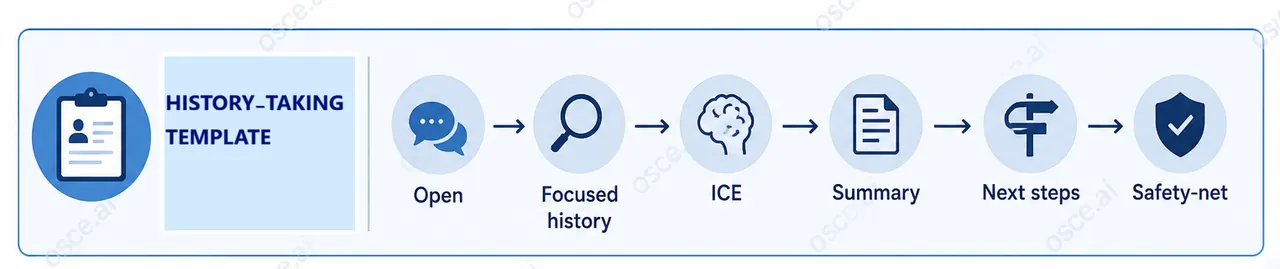
History-Taking OSCE Template
Use this timing plan for an 8-minute history station. Adapt it to your local exam timing.
| Time | Candidate action | Examiner likely rewards |
|---|---|---|
| 0:00–0:30 | Introduce, confirm identity, explain task, gain consent | Professionalism |
| 0:30–1:30 | Open question and patient story | Listening, rapport |
| 1:30–4:00 | Focused symptom analysis and associated symptoms | Clinical relevance |
| 4:00–5:15 | Past history, medications, allergies, family/social history | Completeness |
| 5:15–6:00 | Ideas, concerns, expectations, emotion | Patient-centeredness |
| 6:00–6:45 | Summary back to patient | Synthesis |
| 6:45–7:30 | Impression and next steps | Reasoning |
| 7:30–8:00 | Questions, safety-net, close | Safety and closure |
Condensed History Script
“Hello, I’m [Name], one of the medical students. Can I confirm your full name and date of birth? I’ve been asked to speak with you about [problem]. Is that okay?”
“Can you tell me what brought you in today?”
“Thank you. I’m going to ask some more focused questions now.”
“Is there anything in particular you’re worried about?”
“Let me summarize what I’ve understood so far…”
“Based on this, I would like to [examine / arrange tests / discuss with my senior]. Do you have any questions before we finish?”
Physical Examination OSCE Template
| Time | Candidate action | Examiner likely rewards |
|---|---|---|
| 0:00–0:30 | Hand hygiene, intro, identity, consent | Safety and professionalism |
| 0:30–1:00 | Position, expose, comfort, inspect generally | Preparation and dignity |
| 1:00–4:30 | Core system examination | Technique and sequence |
| 4:30–5:30 | Relevant special tests | Prioritization |
| 5:30–6:15 | Thank patient and restore dignity | Patient care |
| 6:15–7:15 | Present findings | Clinical synthesis |
| 7:15–8:00 | Completion steps and investigations | Safe completeness |
Physical Exam Closing Formula
“To complete my examination, I would…”
Examples:
| System | Completion steps |
|---|---|
| Cardiovascular | Blood pressure, oxygen saturation, ECG, peripheral edema, urine dip if relevant |
| Respiratory | Oxygen saturation, peak flow if relevant, sputum sample if infection suspected |
| Abdominal | Hernial orifices, external genitalia/rectal exam if appropriate, urine dip |
| Neurological | Full cranial nerve/peripheral exam depending on station, fundoscopy where relevant |
| Musculoskeletal | Joint above and below, gait, neurovascular status |

Communication and Counselling OSCE Template
Communication stations are not mini-lectures. They reward structure, empathy, clarity, and shared planning.
| Time | Candidate action | Examiner likely rewards |
|---|---|---|
| 0:00–0:30 | Introduce, confirm identity, agenda, consent | Professional start |
| 0:30–1:30 | Ask what patient already understands | Patient-centered baseline |
| 1:30–4:00 | Explain in chunks using plain language | Clarity |
| 4:00–5:00 | Check understanding and emotion | Responsiveness |
| 5:00–6:30 | Discuss options and next steps | Shared planning |
| 6:30–7:30 | Safety-net and support | Safety |
| 7:30–8:00 | Questions and close | Closure |
Communication Station Script
“Before I explain, can I check what you already understand about what has happened?”
“Would it be okay if I explain the situation step by step?”
“I’ll pause there. Does that make sense so far?”
“How are you feeling about all of this?”
“The next steps are…”
“What questions do you have?”
Avoid jargon. Avoid information dumping. The best communication stations feel like a guided conversation, not a lecture.

Management and Acute-Care OSCE Template
In management stations, safety beats completeness. If the patient is acutely unwell, do not continue a routine script.
Use this structure:
| Priority | What to do |
|---|---|
| 1. Recognize urgency | “This patient appears unwell.” |
| 2. Call for help | “I would call my senior / emergency team early.” |
| 3. ABCDE approach | Airway, breathing, circulation, disability, exposure |
| 4. Immediate monitoring | Observations, oxygen saturation, ECG if relevant |
| 5. Initial treatment | Condition-specific immediate management |
| 6. Focused history/exam | Only what changes urgent management |
| 7. Investigations | Bedside tests, bloods, imaging as appropriate |
| 8. Reassess and communicate | Explain, document, handover |
Example:
“My immediate concern is that this patient may be clinically unstable. I would call for senior help, assess ABCDE, check observations, establish IV access if appropriate, and begin urgent management while continuing focused assessment.”
That sentence shows prioritization, safety, and clinical maturity.
Patient-Centered Communication Checklist
A high-scoring OSCE candidate does not just complete tasks. They shape the patient’s experience.
Dr. Denise Kay’s OSCE Patient Review Checklist is useful because it connects what gets scored with what the patient experiences. Here is an adapted version for student practice.
| Communication domain | What gets scored | What the patient should feel |
|---|---|---|
| Initiating the session | Greeting, role, respect, agenda | “I know who this person is and why they are here.” |
| Gathering information | Open questions, focused follow-up, clarification | “They let me tell my story and understood me.” |
| Patient perspective | Ideas, concerns, emotions, non-verbal cues | “My worry was noticed and taken seriously.” |
| Providing structure | Summaries, transitions, timing | “The conversation made sense and did not feel chaotic.” |
| Building relationship | Eye contact, non-judgment, empathy, confidence | “I felt respected, not judged or ignored.” |
| Closing the session | Summary, next steps, questions, safety-net | “I know what happens next and what to do if things change.” |
This is the difference between “I asked the question” and “the patient felt heard.”
That difference matters in OSCEs because communication is not decoration. It is part of clinical safety.
Common OSCE Template Mistakes
Mistake 1: Memorizing Words Instead of Structure
A rigid script fails when the station changes. Memorize the sequence, not the paragraph:
Open → listen → focus → explore concerns → summarize → examine/explain/manage → close.
Mistake 2: Ignoring the Door Instructions
The station brief is the task. Your template is only a tool. If the brief asks for management, do not spend the whole station taking a complete history.
Mistake 3: Forgetting the Patient’s Agenda
You may know the diagnosis, but the patient may be worried about something else. Ask what they think, what concerns them, and what they hoped would happen.
Mistake 4: Sounding Too Mechanical
Patients do not want to feel like a checklist. Use natural transitions and respond to what the patient actually says.
Mistake 5: Not Showing Reasoning
Do not end with, “I would do some tests.” Instead say:
“My main concern is [X], so I would do [Y] because [reason], and I would involve [senior/team] urgently.”
Mistake 6: Ending Without a Plan
The final minute matters. Summarize, explain next steps, safety-net, invite questions, and thank the patient.
How to Practise With This Template
Use the template actively, not passively.
First, practise the opening until it feels automatic. You should never lose easy marks for failing to introduce yourself, confirm identity, explain your role, or gain consent.
Second, practise moving from open to focused questions. Give the patient space, then narrow clinically.
Third, practise 20-second summaries. Record yourself. If your summary is vague, too long, or disorganized, refine it.
Fourth, practise patient-centered responses. Build a small bank of phrases for anxiety, embarrassment, anger, sadness, and confusion.
Fifth, practise closure under time pressure. Set a timer and force yourself to close in the final 30 seconds.
Sixth, practise with an observer. Ask them to score three things:
| Question | Pass/fail |
|---|---|
| Did I answer the station task? | Pass / Fail |
| Did I look clinically safe? | Pass / Fail |
| Did I make my reasoning easy to mark? | Pass / Fail |
A strong OSCE candidate does not simply know more. They perform more reliably under pressure.
Final Takeaway
An OSCE template is not a shortcut. It is a performance framework.
It helps you stay calm when the station is stressful. It protects basic marks when your mind goes blank. It reminds you to treat the patient as a person, not a task. And it gives the examiner what they need to see: a safe, structured, empathetic future clinician.
Use this OSCE template until the sequence becomes automatic. Then, once the structure is secure, focus on making the encounter feel human.
That is where high-scoring OSCE performance begins.
References and Resources for Further Reading
Silverman J, Kurtz S, Draper J. Skills for Communicating with Patients. CRC Press.